Privileged Just-in-time access on Google Cloud with JIT
Please note that, there is a change to the API JIT uses behind the scenes from the 15th of Jan 2024. In short, this kind of forces you to use the premium subscription of security command centre.
The issue and resolution has been discussed on this issue thread on Github.
Just-In-Time (JIT) privileged access is a method for managing access to Google Cloud projects in a more secure and efficient manner. It's an approach that aligns with the principle of least privilege, granting users only the access they need to perform specific tasks and only when they need it. This method helps reduce risks, such as accidental modifications or deletions of resources, and creates an audit trail for tracking why and when privileged access is activated.
The Just-In-Time Access tool, an open-source application created by Google. It supports this model by allowing administrators to grant eligible access to users or groups. This access is not immediately available; users must actively activate it and provide a justification. The activated access then automatically expires after a short period.
Although the official documentation suggest deploying it to AppEngine, due to its lacking of support on VPC Service Controls (VPC SC), I'll focus on how it runs on Cloud Run instead so that it works for small organisations and large enterprises.
About Identity Aware Proxy
Identity Aware Proxy (IAP) is a powerful service that simplifies the management of user and group authentication and authorisation within Google Cloud. Before delving into Just-In-Time (JIT), it's essential to briefly revisit the fundamental principles of how IAP operates, as JIT relies heavily on it.

This diagram explains a few key components required to deploy IAP on Cloud Run.
- Cloud Run - where the service is deployed, i.e. the JIT app
- Load Balancer Backend - This is the load balancer backend that connects to Cloud Run. Unlike AppEngine, IAP works via Load Balancer instead of directly integrated with Cloud Run to avoid mixing frontend and backend
- Load Balancer Frontend - Where the IP, DNS and SSL certificate is created and also where the user accesses directly.
- IAP Agent - This is very important, without granting the IAP agent service account Cloud Run Invoker role to your service, it will not be able to call Cloud Run
And if you haven't seen the IAP video I created a while back, I highly recommend you give it a view, as this covers all the things you need to know to understand how it works, and how to deploy it with Cloud Run.
Click to watch on YouTube: How to use Cloud Run with IAP
Deploy Just-in-time Privileged Access
Prerequisites
Before you can deploy the IAP enabled Cloud Run service, a few things are required
- Must have a domain name, otherwise IAP won't work
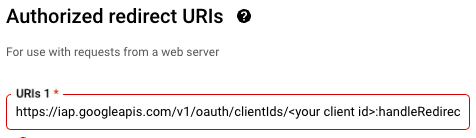
- An OAuth2.0 web credential is required, note down the
Client_IDandSecretwhich will be required to create the GCP resources - Configure an IAP Consent Page
Execute Terraform
Execute terraform to create all resources. You can checkout the code repository on Github.
# Create all resources
export PROJECT_ID=<your gcp project id>
export REGION=<region>
export DOMAIN=<your domain or sub-domain>
export LB_NAME=<name of the load balancer>
export IAP_CLIENT_ID=<iap client id>
export IAP_CLIENT_SECRET=<iap client secret>
export IAP_MEMBERS=<a list of users or groups>
export SCOPE_TYPE=<type of scope, see terraform variables.tf>
export SCOPE_ID=<ID, see terraform variables.tf>
export ARTIFACT_REPO=<artifact repository id>
export IAP_BACKEND_SERVICE_ID=$(gcloud compute backend-services describe jit-sandbox-lb-backend-default --global --format 'value(id)')

terraform apply -var project_id=${PROJECT_ID} \
    -var region=${REGION} \
    -var domain=${DOMAIN} \
    -var lb_name=${LB_NAME} \
    -var iap_client_id=${IAP_CLIENT_ID} \
    -var iap_client_secret=${IAP_CLIENT_SECRET} \
    -var iap_members=${IAP_MEMBERS} \
    -var scope_type=${SCOPE_TYPE} \
    -var scope_id=${SCOPE_ID} \
    -var artifact_repo=${ARTIFACT_REPO} \
    -var iap_backend_service_id=${IAP_BACKEND_SERVICE_ID}
Post deployment steps
The Just-In-Time Access application lets you grant eligible access to a specific user or to an entire group. To evaluate group memberships, the application must be allowed to read group membership information from your Cloud Identity or Google Workspace account.
The Terraform execution will generate a Public IP and an oauth2-redirect-url.
Use the Public IP to configure your DNS, i.e. in this example, I am using the sub-domain jit-sandbox.practical-gcp.dev in this example and you can create something like the following

The oauth2-redirect-url is something you'll need to put in the redirect URL under the OAuth 2.0 Client ID web credential you've generated
And that's it. Give it 10-30 minutes (if you use Cloudflare this is likely to be much faster), and when you enter the domain, it should redirect you to the Google Login page, or whatever your identity provider's login page.
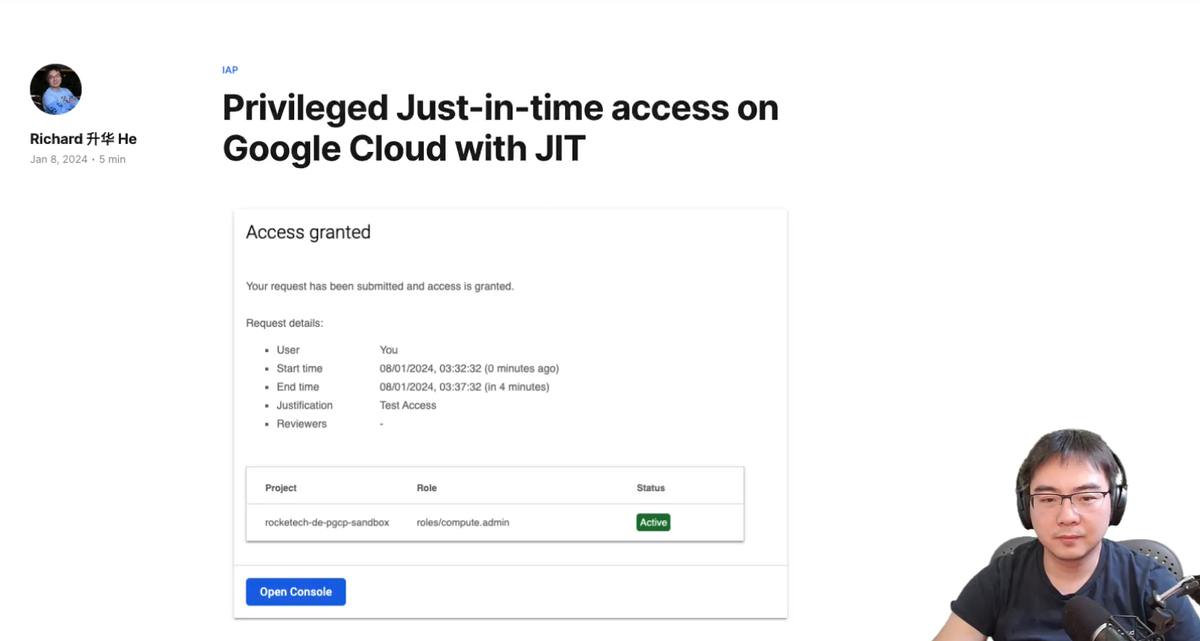
After logging in, you'll be able to see a landing page like this
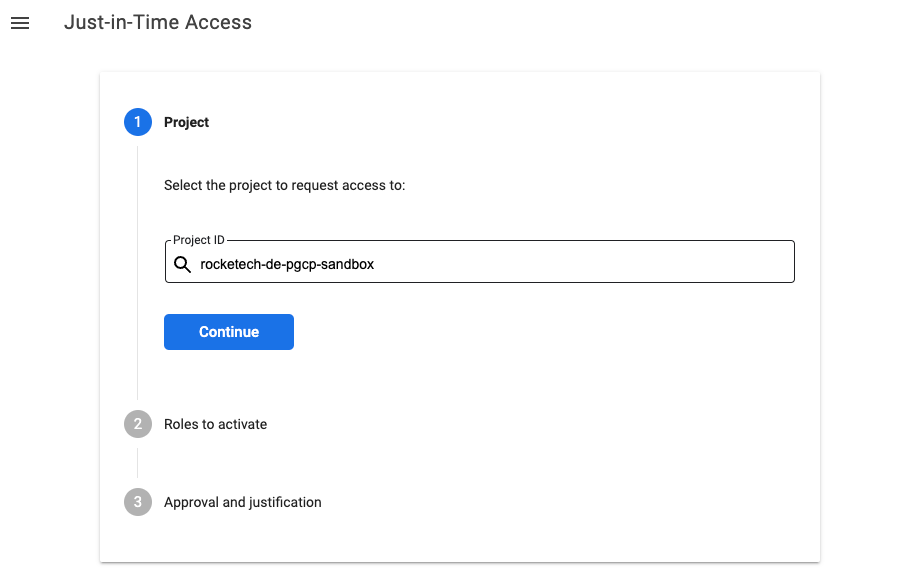
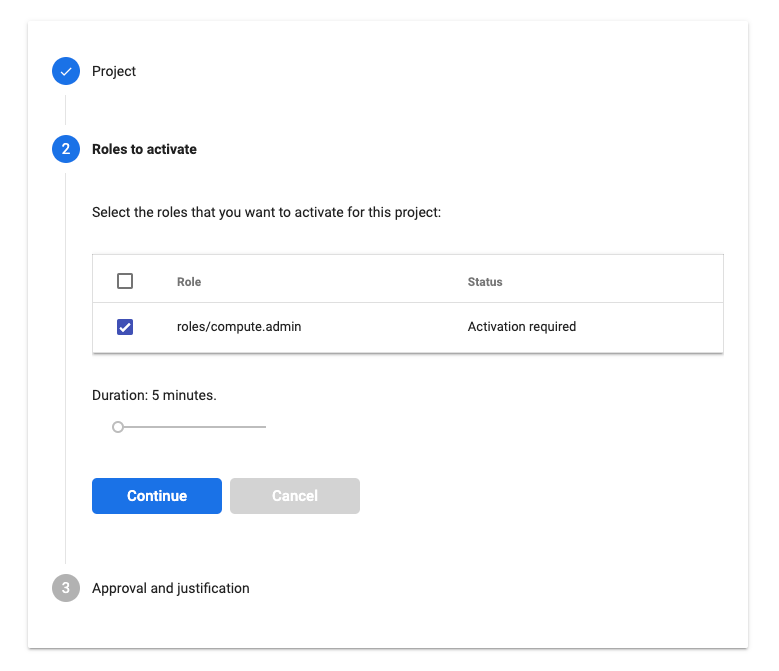
Once Grant Eligible Access are configured, the requestor will be able to see the roles. I.e. in this case the Compute Admin has been made eligible to one user
gcloud projects add-iam-policy-binding $PROJECT_ID \
  --member user:$USER_ID \
  --role roles/compute.admin \
  --condition "title=Eligible access,expression=has({}.jitAccessConstraint)"
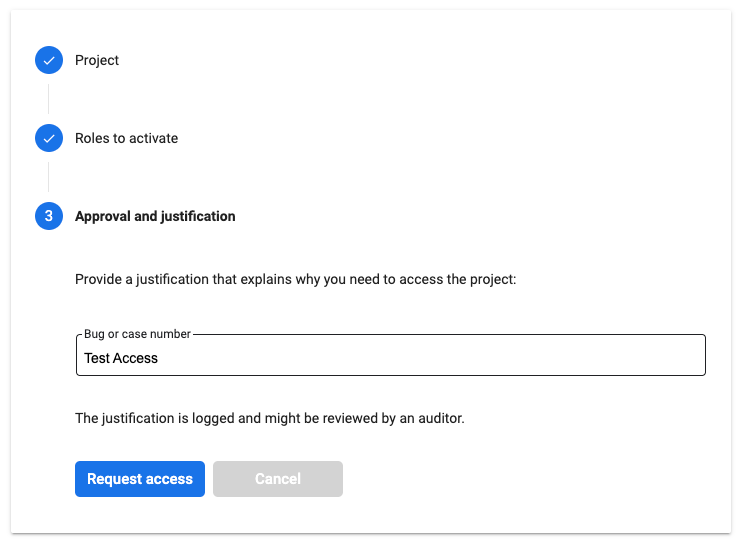
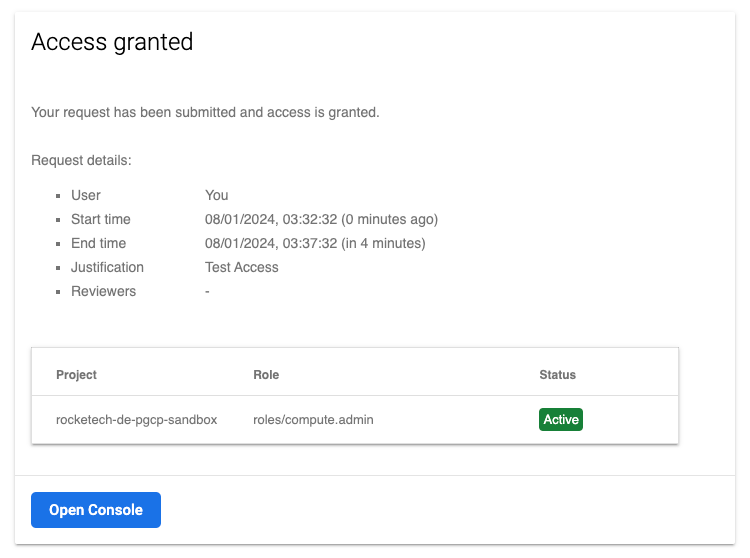
And once submitted, the access will be granted, but only for a specific time period.
Troubleshooting
VPC Connector issue
Serverless VPC connector can sometimes gets created in a bad state. In this case, delete the VPC connector manually and re-run terraform apply
IAP Backend Service ID issue
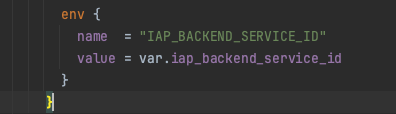
Because of a circular dependency in the Terraform code, the IAP backend service ID (this is a numeric ID) will not be populated in the Cloud Run environment variable during the initial Terraform apply. This variable is essential for validating the audience with IAP to prevent tampering. You will need to perform a second Terraform apply to resolve this issue. Otherwise, the Cloud Run logs will display the following error, and the UI will not load, resulting in a 403 error.

The video on YouTube delves into many more intricate details. If you're interested in learning about the practical use cases or would like to see a more in-depth demonstration of how I assembled everything, heading over to the video would be highly beneficial.

05:48 - About Identity Aware Proxy (IAP)
10:31 - Prerequisites
15:53 - Explaining the code (Terraform)
29:43 - Running the code
34:43 - Demo of JIT
38:31 - Troubleshooting
Comments ()